The Belfast Urban Motorway was the name given to an ambitious scheme to build a continuous free-flow motorway around the city centre. Announced in 1964 but never built, the scheme would have had free-flow links to four motorways (M1, M2, M3, M4) which would themselves link to the rest of the planned motorway network. Eventually a much reduced version of the plan was built as the A12 Westlink, opened 2981-83. Much of the material here was sourced from a report published in book form under the title "Belfast Urban Motorway" in 1967.
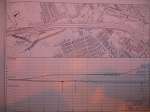
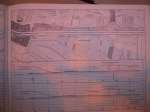
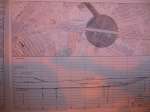
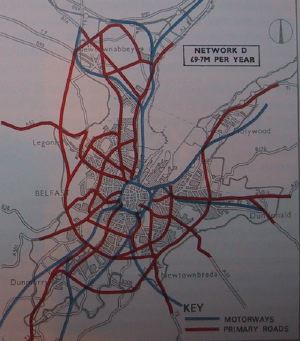
The Belfast Urban Motorway was first proposed in 1964 as part of a wider set of motorway proposals outlined here. In the map below we can see the route of the motorway as originally envisaged in 1964 when the committee began to look at it. The map below was published in the aforementioned document and shows the approximate route envisaged before any work on feasibility had been done.
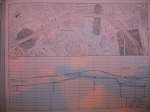
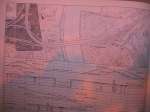
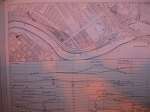
The committee looked at 6 possibilities of routes for the urban motorway, starting with the above "red" route and adding blue, yellow, green, brown and orange routes. The various possibilites are shown on the diagram below from the 1967 report. Among the considerations were whether the northernmost Lagan crossing should be a low bridge, a high bridge (to let ships beneath) or a road tunnel. Other considerations included where the major intersections would be best placed and the precise alignment of each section. The layout of roads to connect the Urban Motorway to the M3 and M7 in east Belfast was, as you can see, particularly controversial.
When they reported in 1967, the committee recommended the blue route with a low bridge over the Lagan. The entire road would be dual-3-lane standard. They divided it into three phases of construction, with costs and dates based on an optimistic assumption that work would start imminently:
- Phase 1 - from the M1 at Broadway to the M2 at York Street. Originally timetabled for construction between 1969 and 1972 at a cost of £14.4m in 1967 prices.
- Phase 2 - from the M2 at York Street across the River Lagan to the M3 at the bottom of the Newtownards Road. Originally timetabled for construction between 1971 and 1974 at a cost of £13.7m in 1967 prices.
- Phase 3 - from the Newtownards Road south through Short Strand, back across the River Lagan, through Shafte
sbury Square to join the start at the M1. Originally timetabled for construction between 1973 and 1976 at a cost of £13.1m in 1967 prices.
The rest of the report included a detailed design of the proposed blue route, which I have reproduced below. You can access each image by clicking on the thumbnail - it will open in a new window. The text will talk you through what you are looking at. The diagrams below each map are stylised elevation diagrams.
 |
1. Connection to M1 motorway. This map has north to the top right. It shows the existing M1 motorway to the left with its terminus on the Donegall Road at the centre. It is then superimposed with the proposed extension towards the city centre, to the right, along the route of the Blackstaff River. This is actually the route later taken by the A12 Westlink. Note that the scheme seems to include an interchange a little to the south of today's Broadway interchange here called the "Bog Meadows interchange". |
 |
2. M1 to Divis Street. This map has north roughly to the right and shows the connection to the M1 to the top left. The motorway to the right roughly follows the route of the modern A12 Westlink. The grey semi-circle shows south-facing sliproads onto Grosvenor Road, while the grey circle indicates a full set of slip roads to access Divis Street. The complex directional-T interchange on the left allows vehicles to also access the southern part of the urban motorway. |
 |
3. Divis Street to York Street. This map has north to the right. It shows the same Divis Street junction as shown in the previous m
ap with a full circle. It also shows south-facing slip roads onto Clifton Street. At the right the road splits into two with the one part heading for the M2 and the other across the river towards the M3. This is roughly the route of the current A12 Westlink except that it stops at traffic lights at York Street. |
|
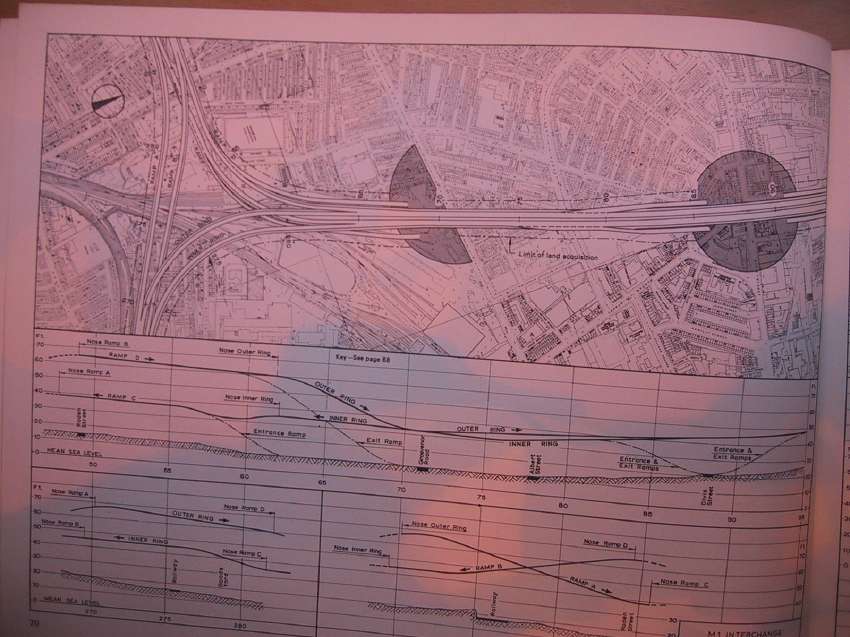
4. Connection to M2 motorway. This map has north to the top right. It overlaps with the previous map, also showing the Clifton Street offslips at the top left. This major free-flow directional-T interchange gives access off the urban motorway to the M2 going off to the upper right. A number of offslips are evident here giving various accesses onto the local road network. The route shown here roughly mirrors the Westlink / M2 / M3 layout today except that this is today a traffic-light controlled junction. |
 |
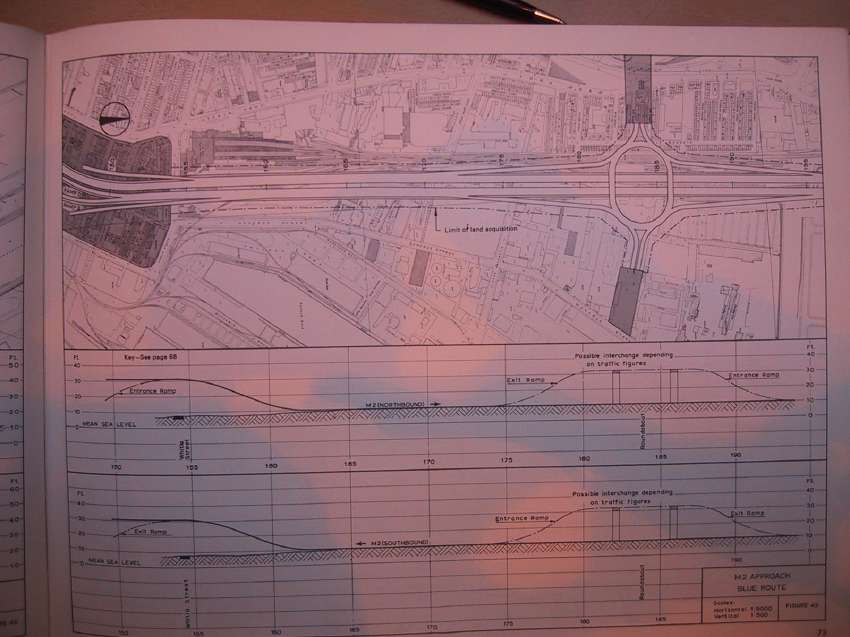
5. Start of M2 motorway. North to the right. Although construction began on this part of the M2 in 1966, a year before this map was published, the final design had obviously not been communicated since it shows the Fortwilliam interchange about 1km too far south, joining York Road roughly where North Queen Street also joins it. The junction was actually constructed well off the edge of this map. |
 |
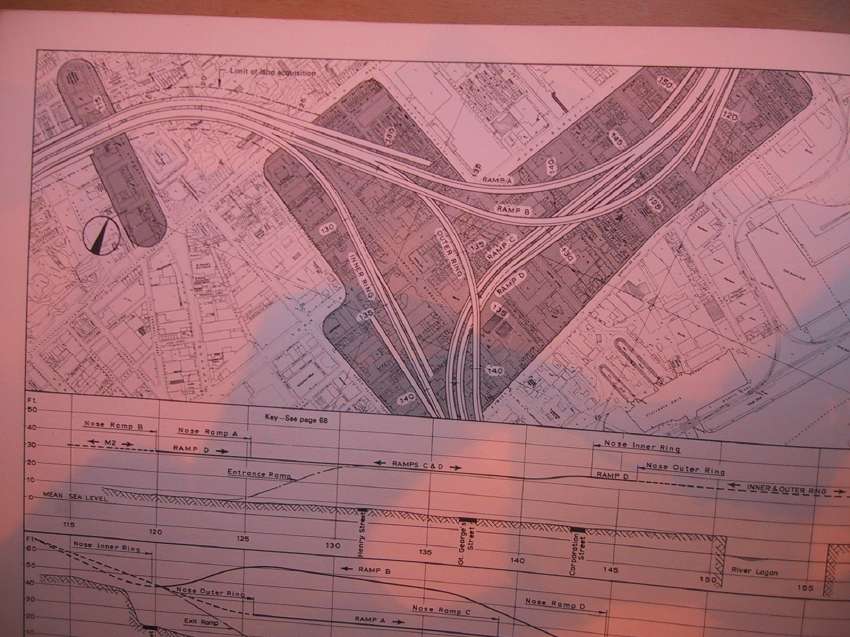
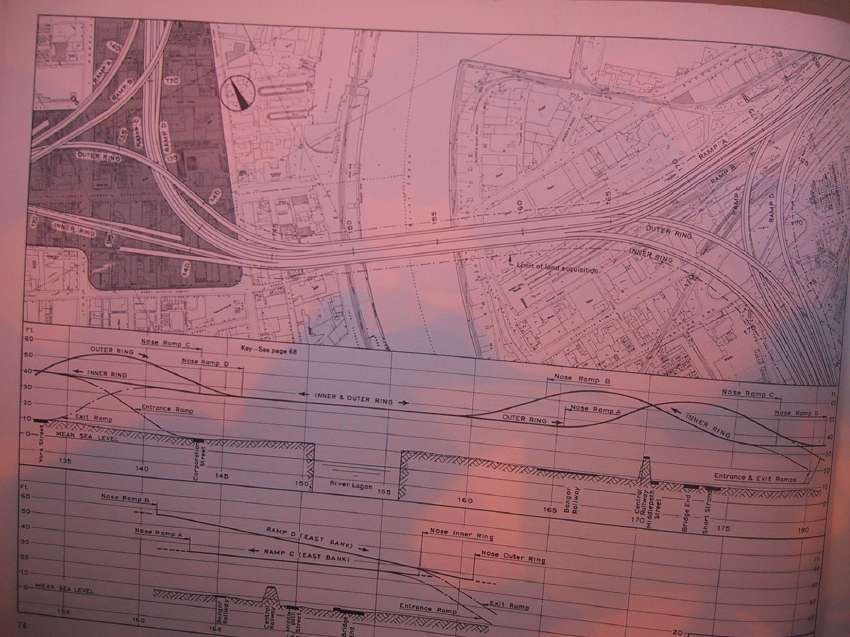
6. Lagan Bridge section. With north to the top. The Urban Motorway would have crossed the Lagan roughly where the M3 does today. It would almost immediately have hit another free-flow directional-T intterchange giving drivers a choice of joining the M3 to the right, or continuing on the urban motorway to the south. Evidently, the Short Strand area would have been largely obliterated by this scheme. |
 |
7. Connection to M3 and M7 motorways. With north to the top. The Urban Motorway curving south is on the left. On the right is the M3 motorway heading towards Bangor. Local connections to the Bridge End area are provided by centrally placed sliproads. The M3 essentially subsumes the Sydenham Bypass in this scheme. The M7 is seen diverging from the M3 and heading towards Dundonald. Access is only provided to the west at this junction. |
 |
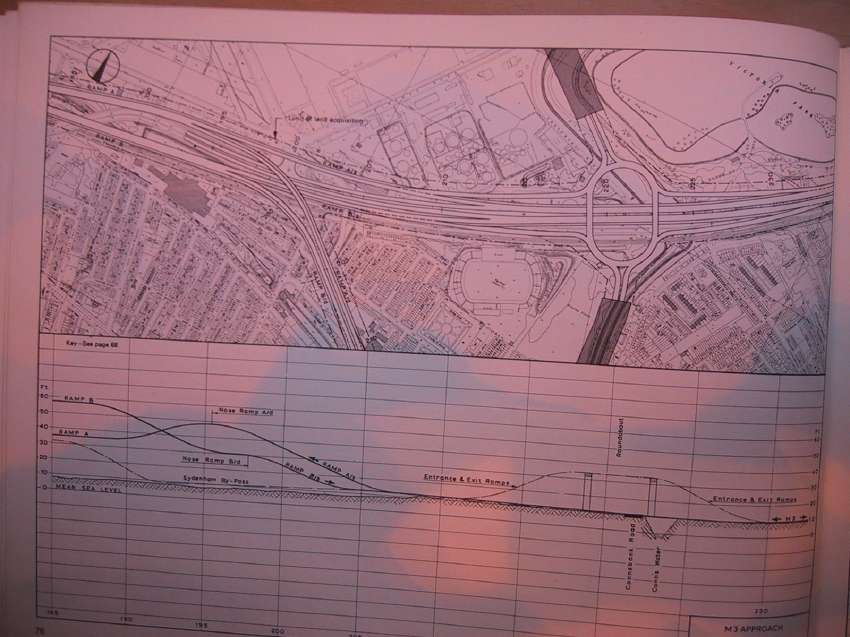
8. Start of M3 and M7 motorways. With north to the top. A continuation of the previous map. Shows the planned major roundabout interchange on the M3 at Victoria Park with southern access to Holywood Arches and northern access into the docks area. Interestingly, as of 2005, this interchange has re-emerged as a proposal for the Sydenham Bypass. |
 |
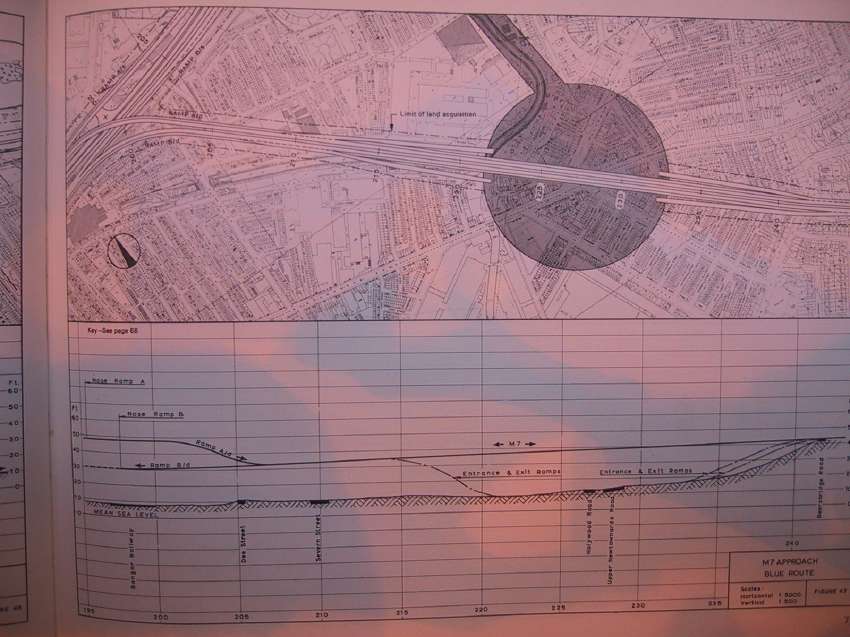
9. M7 motorway at Holywood Arches. With north to the top left. The M7 diverges from the M3 at the left of this map. A major interchange with sliproads is planned at Holywood Arches in the centre of the grey circle. The detail of this interchange is left out, but another map from the same period shows a square one-way system that the slip roads join and which also serves the other major roads. Essentially a square rounabout. This scheme would have required demolition on an unprecedented scale. |
 |
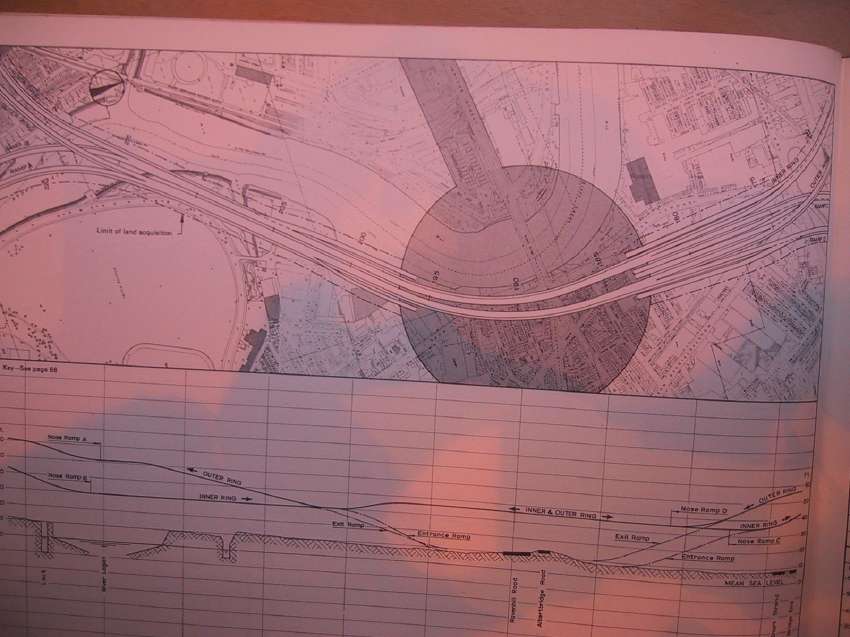
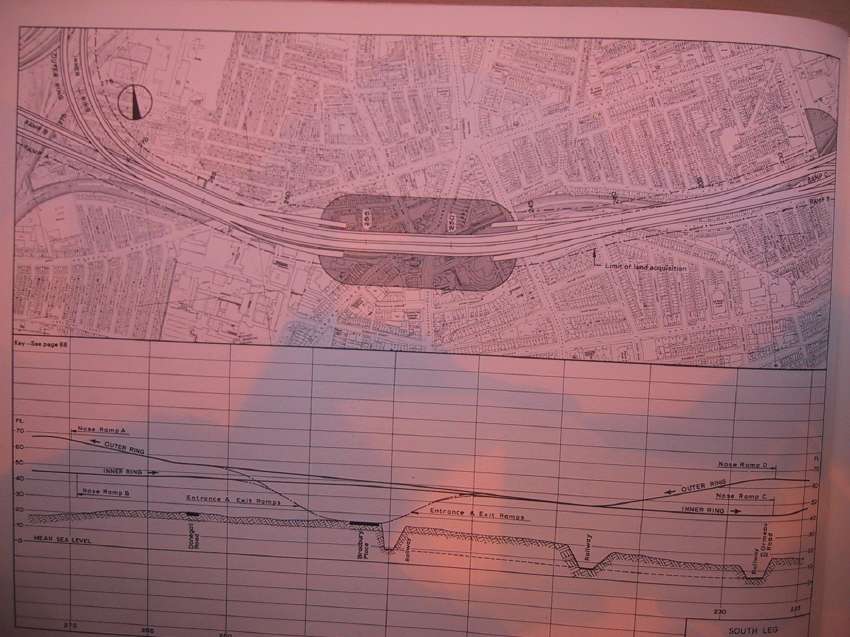
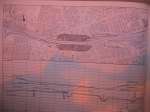
10. Lagan Bridge to Ormeau Park. With north to the right. Back on the urban motorway which joins the Lagan Bridge to the top right. The motorway heads south passing straight through the
Mountpottinger area before turning with the Lagan, touching the northern end of Ormeau Park and crossing the Lagan near the former Gasworks. Another major interchange is planned for the Albertbridge Road in the centre of this frame, but again the details are left out. |
 |
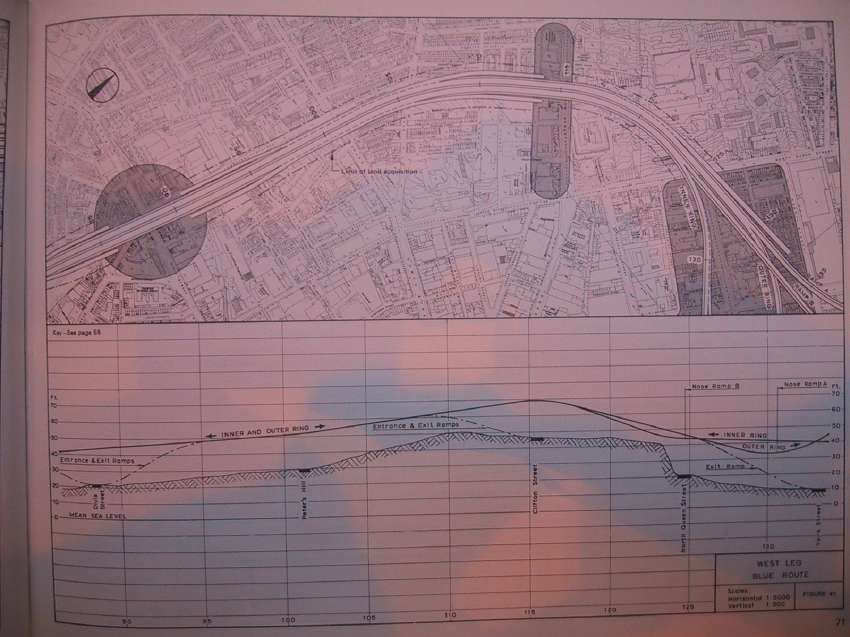
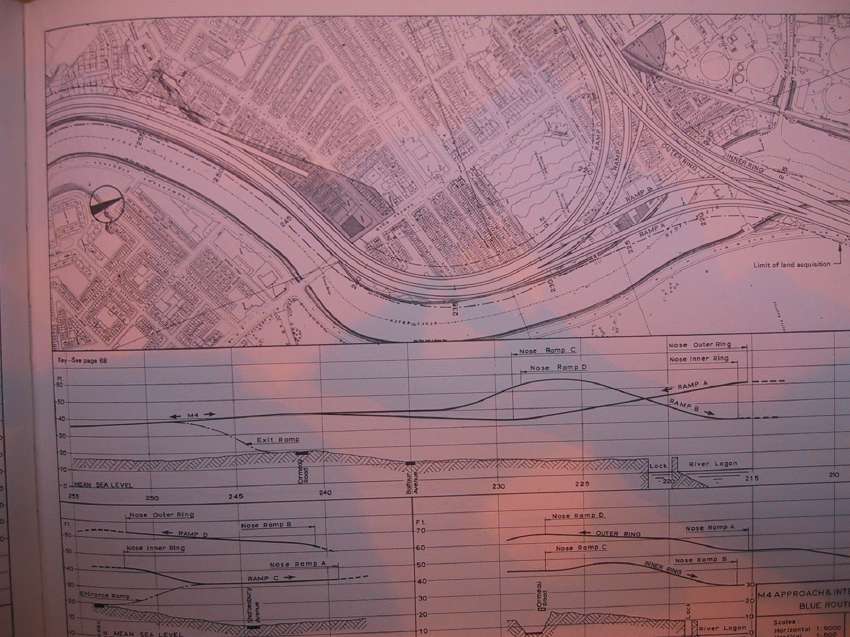
11. Connection to M4. With north to the right. After crossing the Lagan at the right of this map, the urban motorway heads up off the edge. Meanwhile, the M4 motorway joins here. Following the embankment along the western edge of the River Lagan, the M4 would have crossed the Ormeau Road and continued down past Stranmillis. Southbound local access is provided at the Gasworks (top right grey area) and northbound onto the Ormeau Road (grey triangle, left of centre). Picturing this area today with its blend of homes, leafy riverside walks and waterfront cafes, it is perhaps not a bad thing that the M4 was never built here. |
 |
12. M4 to M1. With north to the top. This final map brings us a full circle. The urban motorway leaves its interchange with the M4 on the right and goes left to join the M1 on the left. There is one intersection between these two places, at Bradbury Place. The motorway itself would have crossed on stilts just at the junction of Lisburn Road and University Road. |
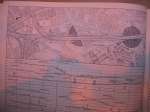
This mock-up photo shows how the M4 interchange might have looked, viewed from the south. The Belfast Urban Motorway runs left to right at the rear, crossing the River Lagan from Ormeau Park. The Ormeau Road is visible on the left.
The scheme outlined above was incredibly complex and ambitious: as ambitious in fact as some of the most well developed schemes in English towns. At the time it was estimated that the entire project could be completed for £41.2m (a cool £460m in 2001 prices).
The scheme did not begin as proposed in 1969 due to a high degree of public opposition and increasing worries about finance. The planners had worked to an assumption of £7m being available per year within the period 1967-1986 for their schemes. However, they had also made contingency plans which were published in the "Befast Transportation Plan" in 1969 over how to proceed if only £4m or £6m were available per year. In the former case, o
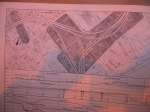
nly phases 1 and 2 of the urban motorway would be built, and the M3, M4 and M7 would be abandoned leaving only the M1 and M2. in the second case, the M3 would also be built. On the other hand, they also produced a plan for what could be achieved if £10m were available. This plan, shown below, was probably never intended as a serious proposition but would have snaked 11 motorways throughout the Belfast area!
In any case, public opposition to large numbers of motorways with acres of demolition and mazes of concrete flyovers was growing all the time as the public saw the detrimental impact of similar schemes in England. In addition, the Belfast council, while supportive in principle, were increasingly wary of the scale of the plans. This all led to a public inquiry in 1971 which lasted 2 years and, when it concluded in September 1973, proposed proceeding with phase 1 but re-thinking the time scale for construction of the rest of the scheme.
This all unfortunately coincided with the start of the civil disorder known as the "Troubles" which began in 1969 and was at its worst during 1972 when one person was murdered approximately every 18 hours. This civil disorder was intense in the west of the city where repeated attempts to begin phase 1 had to be abandon
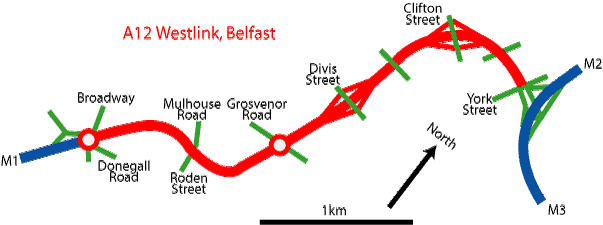
ed. 1973 saw both the Oil Crisis and major funding shakeups to finance security and policing. This new climate led to a full scale review of the 1969 Transportation Strategy in 1975. It reported in 1976 and was itself the object of a public inquiry which dragged on into 1978. Its recommendations were to abandon virtually the entire scheme except for phase 1, which was downgraded to a 2-lane dual-carriageway with two grade-separated junctions, two at-grade roundabouts and one at-grade traffic light controlled junction. This became the A12 Westlink which opened in two stages in 1981 (M1 to Grosvenor Road) and 1983 (Grosvenor Road to M2). The M3, M4 and M7 plans were all abandoned in the mid 1970s.
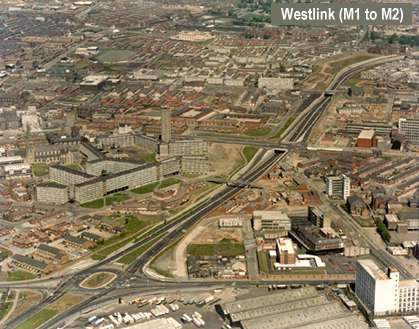
The map below shows what the Westlink looked like in 2002. (It looked the same as this when it opened in 1983 except that the M3 had not been built.) Beginning at a set of traffic lights on York Street, the Westlink first climbed up to cross North Queen Street, before dropping down into a canyon to pass under Clifton Street. Four sliproads where provided here - the first junction. It then dropped down to pass under Peter's Hill with no connection, and then again (still in the canyon) to pass under Divis Street. There was a junction with sliproads at Divis Street. The road then halted at a signalised roundabout on Grosvenor Road. After this, it curved round to the Roden Street/Mulhouse Road junction which was a standard signalised cross-roads. Finally, it terminated on another signalised roundabout at Broadway. The M1 motorway joined the other side of Broadway roundabout. The Westlink was two lanes each way for its entire length.
This photograph shows the Westlink shortly after opening in 1983 seen looking north from the Grosvenor Road roundabout (bottom) towards Clifton Street (top right). Virtually all of the 1960s flats seen here are now gone.
[Photo from the UK Motorway Archive http://www .iht.org/motorway/wlink.htm]
Grosvenor Road roundabout seen from the south around 2005. [Wesley Johnston]
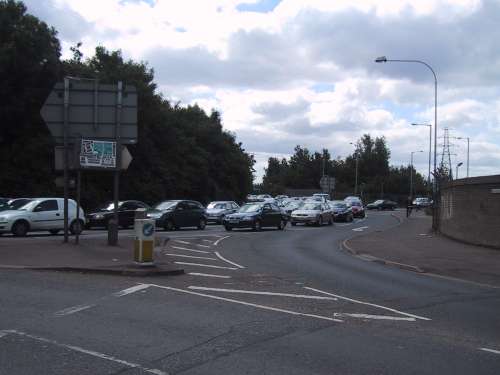
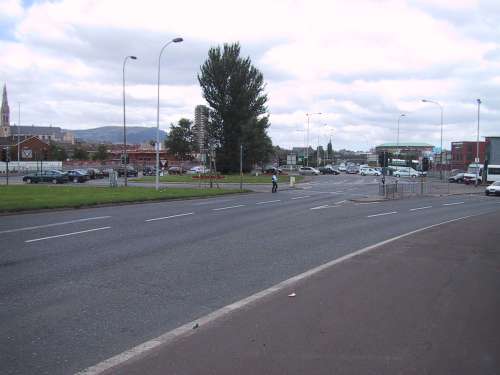
Broadway roundabout in rush hour, 2005. These vehicles are all stationary on the gridlocked Westlink. [Wesley Johnston]
While the Westlink was a godsend for traffic which no longer clogged up the city centre, and particularly for the Port of Belfast, it was apparent from the start that the road could not cope with the level of traffic that was attracted to it. Queues developed at the two roundabouts almost immediately and as traffic levels rose and rose over the next twenty years the road gradually ground to a halt. By 2004 average daily traffic had almost reached 70,000 vehicles with traffic on the M1 tailing back to Lisburn on weekday mornings. There is a myth that the Westlink is Northern Ireland's busiest road - in fact this accolate falls to the M2 - but it is certainly one of the most congested.
A limited improvement scheme was carried out in 2002. This involved widening the Westlink to three lanes M1-bound from Grosvenor Road, through the Broadway roundabout and for the first few hundred metres of the M1. This was achieved on the Westlink by repainting the lines on the road with narrower lanes, and on the M1 by removing the hard shoulder. At the same time, the Westlink was widened to three lanes in the opposite direction, but the majority of the third lane was designated as a bus lane which terminated at Roden Street, where a new dedicated busway into the Europa Bus Centre was built. These improvements helped bus travellers, and increased the throughput on the Broadway roundabout, the worst bottleneck. Widening was not possible on the remaining stretch since it was in a narrow canyon with vertical sides.
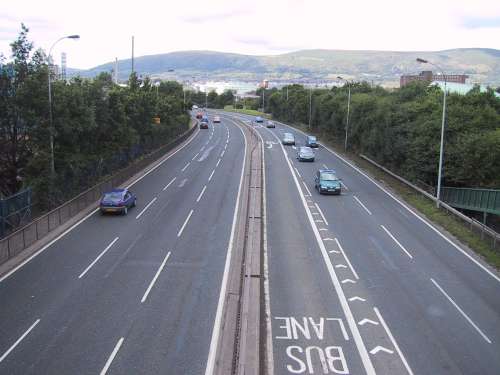
The Westlink after the 2002 widening project, seen looking towards Broadway from a footbridge at Roden Street. You can still make out the original painted lines which were there before the project. On the right is the new Westlink bus lane on the inbound carriageway. [Wesley Johnston]
However it was apparent even early on that it had been a major miscalculation to build the Westlink with at-grade roundabouts. The 2002 upgrade helped a bit, but it was clear that only by removing the at-grade junctions entirely would the road be able to see significant improvements. But the thought of closing the Westlink for several years to upgrade it was so horrendous that many people felt that the situation could not ever be remedied.
The aspiration to upgrade the Westlink by getting rid of the three at-grade junctions finally became financially possible in the early 2000s. The £104m scheme, which was funded by a design-build-finance-operate (DBFO) contract, was announced in July 2004, with work proper starting in January 2006. The contractor managed to maintain two lanes each way during peak times - no small achievement - whilst simultaneously diverting two live rivers at Broadway and building two underpasses. Although traffic was very bad during the upgrade, it could have been much worse.
The project saw the Grosvenor Road roundabout replaced with a three-lane underpass. Sliproads were provided in the M1-facing direction, but not in the M2-facing direction because Divis Street junction was too close. Broadway roundabout was also replaced with a three-lane underpass, with a full compliment of sliproads. Roden Street junction was closed, while Mulhouse Road (opposite Roden Street) became a left-in, left-out junction. The Westlink bus lane was removed, and replaced by a segregated busway that runs from Broadway roundabout parallel to the Westlink. Buses leaving the city towards the M1 could join the Westlink at a new bus-only onslip where Roden Street lights used to be. The Westlink itself became three proper lanes from Broadway as far as Divis Street. All the major elements of the project were completed by summer 2008, ahead of schedule, with the final works continuing for several months. This meant that the Westlink was now free of traffic lights at all points, except for its terminus at York Street.
This project is covered in much more detail, with lots of photographs, on the dedicated Westlink Upgrade page. A page on the Westlink in its current form is here (but as of July 2008 it has yet to be updated to reflect the recent upgrade).
The maximum capacity of the Westlink will not be fully achieved until the traffic lights at York Street are removed and traffic can continue freely onto the M2 and M3. Roads Service are currently progressing a plan to complete this link, but it is likely to be between 2013 and 2018 at the time of writing (July 2008). The most up-to-date details will be maintained on this page. Although the Westlink is now three lanes wide for over half its length, the original canyon section between York Street and Divis Street remains two lanes each way. The engineering challenges of widening this section would be immense, and for this reason there are no current plans to do so. However, it is worth noting that Roads Service do still own slices of land on either side of the Westlink here (vested for the original Belfast Urban Motorway) meaning that such an upgrade is at least possible without major demolition.
As for the original Belfast Urban Motorway plans, the climate of public and government opinion has since moved so far that it seems very unlikely indeed that any other parts of the proposals will ever be built.
|